
Instructions for the installation of construction fences using PVC rails type “Korner” can be downloaded from this link: link to download the PDF file
To properly fasten the rail, use rivets or screws. Before fastening, with due care, drill the rail in the places marked on the drawing with a drill with a diameter corresponding to the fastening (the recommended diameter is 4 to 5 mm)
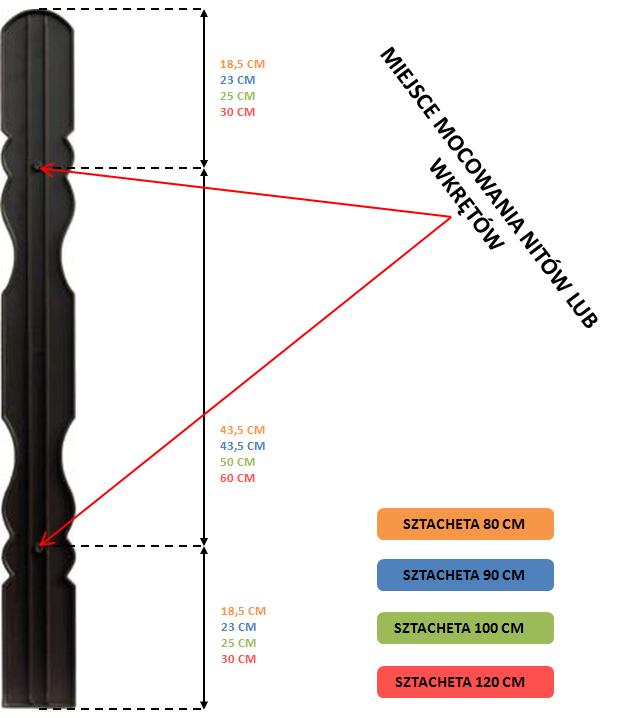
If the rails are mounted to the fence “from behind”, the mounting location should be drilled to the appropriate distance. On the other hand, for front mounting with screws, bolts or other fasteners, use pieces that are flat against the rails.
IN CASE THE SPACING OF THE PLACES TO BE FIXED DOES NOT MEET YOUR REQUIREMENTS, IT IS POSSIBLE TO FIX THE RAILS IN ANY PLACE, USING PLASTIC SPACERS.
The average number of rails per running meter of the fence is:.
8 pieces (for patterns A-D)
9 pieces (for pattern E)
7 pieces (for pattern F)
Installation instructions for Korner rails pattern D+
To install, drill the rail in two places along the center of the rail. The holes should have a diameter minimally larger than the diameter of the screw, bolt or other fastener.
For installation, use fasteners that fit flat against the rail (we recommend locking screws).
Screw the fastener until you feel a slight resistance (screw in with feeling, it is not recommended to use tapered fasteners, etc., also rivets are not used to install D+ pattern rails).
Installation instructions for Korner rails pattern A and C glued
We install the rails with screws from behind in specially reinforced places. Before screwing in the screws, we carefully measure the length that we can screw into the rail and pre-drill it (in the case of self-tapping screws, we can skip pre-drilling).